push-up-counter-cam
Prop your phone against a wall and it counts your push ups out loud. A pose model runs in the browser and watches your elbow angle, normalised by torso length so it works at any distance from the camera, with a dead band that stops one push up counting twice. All of it runs on the device, so no video, no frames and nothing derived from them ever leaves your phone, and there is no account to make. You never touch the screen between starting and finishing a set. Expect to nudge the two thresholds once to suit your body and where the camera sits.
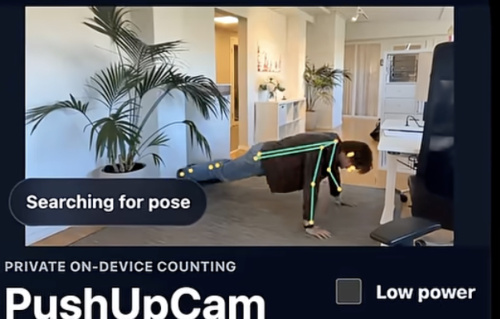
Build me PushUpCam.
1. The core brief
This section is the whole app in one page. If you only read this, you will still build recognisably the right thing.
What it is. PushUpCam is a mobile first web app that counts your push ups by watching you through the phone's front camera. You prop the phone up sideways a metre or two away, pick a rep goal, tap Start, and it counts each rep out loud while a progress bar fills. Every bit of the pose detection runs in the browser on the device, so no video, no still image and no rep data ever leaves the phone. It is for anyone who wants a hands free rep counter during a set, and the privacy story is the selling point rather than a footnote.
The screens. One route, /, one screen that changes shape.
- Start. Almost empty. A goal picker and one large Start button. Tapping Start is what asks for the camera.
- Camera live, not counting. A mirrored preview with a skeleton drawn over your torso and arms, small reps and goal cards, Start and Reset.
- Counting. The camera fills the screen. A progress card at the top, two large buttons at the bottom, nothing else.
- Goal complete. Same layout, bar full, a chime, a buzz and a spoken announcement.
- Manual mode. No camera available. A card saying exactly why, and plus and minus buttons so the set can still be finished.
The features that define it. Absent any of these, somebody would say it is not the same app.
- Live rep counting from the front camera using pose detection that runs in the browser, with no server involved in the counting at all.
- Honest counting. A rep needs a real descent and a real press back to the top, so half reps do not count and one movement never counts twice.
- A confidence gate: when your body is not clearly in frame the app says so and stops counting rather than inventing reps.
- A goal selector, a progress bar, a "N of M complete" line and a percentage. Changing the goal mid set keeps the reps you already did.
- The count is spoken out loud, one number per rep, because you are two metres from the screen and cannot read it.
- A short beep on every rep, and on reaching the goal a two note chime plus a vibration, firing exactly once.
- A live rep phase readout (waiting, searching, top, bottom, moving, complete) that works even before you press Start, so you can check your framing.
- A skeleton and keypoint overlay drawn over the mirrored video every frame, so you can see what the app can see.
- Start doubles as the camera permission request. There is no separate "start the camera" screen and no extra tap.
- A manual plus and minus counter that takes over whenever the camera or the model cannot be used, with the specific reason shown on screen.
- Every camera failure handled out loud: no browser support, permission denied, no camera present, insecure origin, detection failing on the device.
- A low power mode that drops the camera resolution and frame rate and halves the inference rate, for older phones and longer sets.
- Counting pauses when the page goes to the background and picks up again without a second permission prompt.
- Nothing is stored anywhere. No account, no history, no analytics, no
localStorage. Reload the page and you are back to zero, on purpose. - It deploys as a plain Node app behind an HTTPS URL, which the camera needs.
The feel. Dark, quiet and close to empty. The phone is a piece of gym equipment propped two metres away, so the screen carries almost nothing: one big button, one bar, and the voice does the talking. Nothing animates except the progress bar, because every frame of budget belongs to the camera loop. It should feel calm and slightly clinical, a tool that is watching you rather than an app that wants your attention, and you should never have to touch it between the tap on Start and the end of the set.
About the rest of this document. Everything after section 2 is detail to draw on, not a specification to satisfy line by line. You are expected to make your own version. Different wording, different layout, different colours, different copy, different small interactions: all fine, all expected. The numbers in here are the ones the original settled on, offered so you have somewhere to start rather than a blank.
2. Fidelity: what matters and what does not
2.1 Must match, or it is a different app
Seven things. This is the product.
- You prop the phone up, it watches you through the front camera, and it counts your reps from what it sees. A tap counter with a camera picture behind it is a different app.
- It counts out loud, one number per rep, so the set works with the screen out of reading range.
- You never touch the screen between the tap on Start and the end of the set.
- Counting is honest: a half rep does not count, and one push up never counts twice.
- All inference stays on the device. Nothing derived from the video is sent anywhere. This was sold as the point of the app, so a version that ships frames to a server for counting is not a variation, it is a broken promise.
- One screen, one goal, a bar that fills, and a finish you can hear and feel.
- Nothing is remembered. Close the page and the set is gone.
2.2 Must be right, or it breaks
Not taste. Get these wrong and you get a broken app rather than a different one.
- A dead band between the up and down thresholds. The rep phase only flips when the signal crosses one of two separated thresholds, never a single one. Without a gap, ordinary noise around the crossing point flips the phase back and forth and the counter double counts every rep, which makes the app worthless. The original uses 0.72 up and 0.38 down on a 0 to 1 signal, a band 0.34 wide. Move both values as much as you like. Do not close the gap, and clamp the down threshold so it can never exceed the up threshold.
- A confidence gate on every frame. If the pose reading is missing or its confidence is below the minimum (0.45 in the original), count nothing and clear any pending phase change. Without this, a half visible body, a bad light or a person walking past generates phantom reps. Clearing the pending change matters as much as skipping the frame.
- Counting only on a committed transition from down to up. One direction of travel counts, once, guarded by a minimum number of frames since the last rep. The completion announcement fires on exactly one frame, latched by a sticky flag that only a reset re arms. Each half of that has its own failure. Count both directions of travel and one push up scores two. Drop the frame guard and a fast bounce scores two. Drop the sticky latch and the completion chime and the spoken announcement fire again on every frame after the goal is reached, which is roughly thirty times a second.
- The
getUserMediaflow with every failure state handled. Missingnavigator.mediaDevices,NotAllowedError,NotFoundError, an insecure origin, and the pose model throwing at inference time. A camera app that dies on a denied permission is dead on arrival, so each of these has to land somewhere with a message a human can act on. - A manual fallback counter, reachable from every one of those failures. Plus and minus, and the set can be finished by hand. This is what turns a dead app into a slightly worse app.
- HTTPS.
getUserMediaonly runs in a secure context.localhostcounts, so a laptop dev server works, but a plainhttp://192.168.x.xaddress on your phone does not. Deploy first, then test on the phone against the HTTPS URL, and detect the insecure case in code so the user gets told rather than confused. - The mirroring agreeing in three places: the CSS flip on the video, the horizontal flip on the pose estimate, and the mirrored canvas transform. Get one of the three wrong and the skeleton sits on the wrong side of the body.
- The mobile audio unlock. Mobile browsers start the audio context suspended and only a real user gesture can resume it, and speech synthesis needs priming too. Do it on the first gesture. When this is missing the app is silent on exactly the device it was built for, and it fails without an error.
- One inference in flight at a time. Never await inside the animation frame callback and never stack inferences, or a slow phone falls further and further behind.
- The deployment contract. One app at the repository root, a single
package.jsoncarrying both abuildand astartscript,startreadingprocess.env.PORTand binding0.0.0.0, the build output gitignored, and no monorepo subdirectory (see section 18 for whysubPathsilently breaks the environment). Every piece of that has its own failure, and they all look like "the deploy is broken" rather than pointing at themselves: a missing script and the build never runs, a hardcoded port or a bind tolocalhostonly and the platform's router cannot reach the process, so the container looks healthy in the logs and dead in a browser, a committed build directory and a redeploy serves stale assets, a subdirectory and the app boots with none of its environment. - The rep logic kept free of the DOM and of browser APIs, in its own module with unit tests. Not architectural taste: it is the only way to debug and retune the thresholds without doing push ups in front of a camera for every change.
The load bearing numbers, and only these. Everything else in this document is tunable.
- The gap between the up and down thresholds, whatever values you choose. The 0.72 and 0.38 defaults are tunable, the separation is not. Zero gap equals double counting.
- The down threshold clamped to at most the up threshold, so a bad config cannot invert the band. An inverted band satisfies both tests at once, so the phase flips on every frame and the counter runs away on its own.
- A minimum confidence above zero, and a debounce of at least one frame. A pose model with no confidence floor will happily report a skeleton in an empty room.
- A minimum frame spacing between reps of at least one frame, and the reset seeding that counter as already satisfied so the first rep of a new set is not swallowed.
PORTread from the environment. The 8080 fallback is a convenience; the reading is the contract. Hardcode a port and the process starts, the log line prints, and nothing outside the container can reach it.- The pose model's own input size, whatever model you pick. That one is the model's number, not yours. The library resizes each frame for you; if you take that plumbing over yourself, a mismatch either throws or hands the model a distorted frame and the keypoints drift without any error to tell you why.
2.3 Yours to change
Generously. All of it:
- The name, the wordmark, the favicon, the manifest, every word of copy including all the status pill and coach lines in section 6.6.
- The palette, the fonts, the radii, the shadows, the gradients, dark versus light, and whether there is a desktop layout at all.
- The layout, the breakpoints, the ordering of the cards, which state hides what.
- The goal options and the default goal.
- Which extras you include: the low power mode, the portrait feed guidance, the installable manifest, the phase readout, the calibration helper, the tests.
- The pose model and the library. MoveNet through TensorFlow.js is a choice, not a requirement. Any pose model that gives you shoulder, elbow, wrist and hip positions with per keypoint confidence and runs in the browser will do. The in browser part is the requirement, from 2.1 point 5. Everything else about the model is yours.
- Every tuning number in this document. The 0.72 and 0.38 thresholds, the 80
and 20 per cent metric weighting, the 55 and 170 degree angle mapping, the 0.35
keypoint score gate, the 2 frame debounce and 4 frame rep spacing, the
requested 960x540 at 30 fps and the low power 640x360 at 15 fps, the 880 Hz
beep, the 660 and 990 Hz chime, the speech rate, the
[120, 80, 160]vibration pattern, every pixel size and every colour.
Expect to retune the thresholds. They depend on your body, your camera height, how far away the phone is and how the light falls. If the app misses reps you are reaching for, move the up threshold down. If it counts when you are resting at the top, move it up. If it counts half reps, raise the down threshold. Retuning is the normal way to finish this app, not a sign that you built it wrong. The original's numbers came out of real use with one body and one camera placement, which is very likely not yours.
2.4 Build this in stages, and deploy stage 1 first
Do not try to build the whole thing in one pass. The work is staged, and the staging is not decoration: camera access needs HTTPS, so until the app is reachable at an HTTPS URL you cannot test the one feature that defines it on the device it is built for.
Stage 1, which is everything above plus nothing else, in this order:
- A deployable shell. A root
package.jsonwith abuildand astartscript, anindex.html, and a static Node server readingPORT. Deploy it and open the HTTPS URL on your phone before you write any app logic. - The rep state machine as a pure module with unit tests, fed plain
{ metric, confidence }objects. Do this before any camera code. It is miserable to debug through a camera and trivial to debug through numbers. - The camera on screen, mirrored, with Start as the thing that asks for permission, and every failure path plus the manual counter handled in the same sitting.
- The pose model and the animation frame loop, with the overlay, so you can see what the model sees before you trust it.
- Join them, then the voice, the beep and the mobile audio unlock.
- Deploy again, do a real set in front of the phone, and retune the thresholds.
Stage 2 is the rest of section 1: the goal selector and the completion moment, the live phase readout, the three layout states, low power mode, the pause on backgrounding, and a desktop layout if you want one.
Stage 3 is polish: the palette and type, the propped up phone details, the iOS portrait feed guidance, installability, and tests.
Section 21 spells all three out against the detailed sections. If you are working from this core brief alone, the six steps above are the whole of stage 1.
3. What it is
PushUpCam is a mobile first web app that counts your push ups by watching you through the phone's front camera. You prop the phone up sideways, pick a rep goal, tap Start, and it counts each rep out loud while a progress bar fills. All of the pose detection runs inside the browser on the device. No video, no image and no rep data ever leaves the phone, there is no account, there is no server side storage and there is no upload of any kind. It is for anyone who wants a hands free rep counter during a set, and the privacy story is the selling point: the camera feed is processed in the page and thrown away frame by frame.
It is a single screen app. Roughly 1000 lines of plain JavaScript, no framework, no database, no authentication, one static Express server. The whole thing is deployable as a Node app on a platform like Liivo.
What is in the rest of this document. 4 how to use this prompt, 5 the tech stack the original used, 6 screens and states, 7 the full feature list, 8 the detection algorithm with real numbers, 9 camera and permissions, 10 audio, speech and haptics, 11 the skeleton overlay, 12 the in memory data model, 13 the server routes, 14 mobile behaviour, 15 look and feel with design tokens, 16 external services, 17 environment variables, 18 deploying on Liivo, 19 things the original did that you should not copy, 20 an acceptance walkthrough, 21 a staged build order, 22 hard won facts and gotchas to reach for when something goes wrong. Section 8 is the one that decides whether the counting feels right, so do not skim it. Read it as reference material for the fidelity rules in section 2, not as a checklist.
4. How to use this prompt
Pick one of these three paths.
(a) Liivo MCP connector (no terminal, easiest). Go to https://www.liivo.ai/connect and add a custom MCP connector with the address:
https://my.liivo.ai/mcp
In Claude that is Settings > Customize > Connectors > Add custom connector. In ChatGPT (Plus or higher) it is Settings > Plugins > MCPs > Add MCP server. Sign in when prompted, which also creates your Liivo account. Then send this as your first message:
Use setup-project for a mobile first push up counter web app that counts reps with the phone camera
Paste the rest of this prompt as your second message. Let the AI scaffold and deploy before you ask for changes, so you have a working HTTPS URL to test the camera against.
(b) Any AI in a local folder, then deploy.
Create an empty folder, open it in Cursor, Windsurf, Claude Code, Codex or
whatever you use, and paste this prompt. Build and test locally with
npm run dev, then push the folder to a git repository and point Liivo (or any
Node host) at it.
(c) Claude Code or Codex in a terminal.
mkdir pushupcam && cd pushupcam && git init
claude    # or: codex
Paste this prompt as the first message.
Whichever path you pick, remember one thing: camera access needs HTTPS.
localhost counts as secure so npm run dev works on your laptop, but you
cannot test on your phone over a plain http://192.168.x.x address. Deploy
first, then test on the phone against the HTTPS URL.
5. Tech stack
This is the stack the original used, and the combination is what makes the app
small and fast to start. It is a starting point, not a requirement. Any current
equivalent is fine, the versions below are simply the ones that were known good,
and as section 2.3 says the pose library in particular is a choice as long as it
runs in the browser. What matters is that the counting stays on the device and
the repository deploys with one build and one start script.
| Piece | Version | Why |
|---|---|---|
| Vanilla JavaScript, ES modules | no framework | The app is one screen and one animation loop. A framework would add weight and fight the per frame canvas drawing. |
| Vite | 7.x | Dev server with HTTPS friendly --host binding, and a production build that code splits the heavy pose libraries behind a dynamic import. |
| @tensorflow-models/pose-detection | 2.1.3 | Provides MoveNet with keypoint smoothing already built in. |
| @tensorflow/tfjs-core | 4.22.0 | Tensor runtime. |
| @tensorflow/tfjs-converter | 4.22.0 | Loads the MoveNet graph model. |
| @tensorflow/tfjs-backend-webgl | 4.22.0 | GPU backend. Required for usable frame rates on a phone. |
| Express | 4.x | Serves the built static files and one health route. Nothing else. |
| Vitest | 3.x, jsdom env | Unit tests for the rep state machine and the audio module. |
| Playwright | 1.x | One smoke test at a 390x844 mobile viewport. |
No database. No ORM. No auth library. No state manager. No CSS framework, the styling is one hand written stylesheet.
package.json:
{
  "name": "pushupcam",
  "version": "0.1.0",
  "private": true,
  "type": "module",
  "scripts": {
    "dev": "vite --host 0.0.0.0",
    "build": "vite build",
    "start": "node server.js",
    "test": "vitest run",
    "test:e2e": "playwright test",
    "check": "npm run build && npm run test && npm run test:e2e"
  },
  "dependencies": {
    "@tensorflow-models/pose-detection": "^2.1.3",
    "@tensorflow/tfjs-backend-webgl": "^4.22.0",
    "@tensorflow/tfjs-converter": "^4.22.0",
    "@tensorflow/tfjs-core": "^4.22.0",
    "express": "^4.19.2"
  },
  "devDependencies": {
    "@playwright/test": "^1.53.0",
    "jsdom": "^26.1.0",
    "vite": "^7.0.0",
    "vitest": "^3.2.0"
  }
}
File layout:
/
  index.html                    single page, all markup lives here
  server.js                     Express static server, production only
  vite.config.js                dev server host 0.0.0.0 port 5173, vitest jsdom config
  playwright.config.js
  package.json
  public/
    favicon.svg
    manifest.webmanifest
  src/
    main.js                     wiring, state, render, the requestAnimationFrame loop
    camera.js                   getUserMedia constraints and the landscape retry
    poseDetection.js            MoveNet loading, inference, overlay drawing, phase hint
    audioFeedback.js            WebAudio beeps, speech, vibration, iOS unlock
    core/
      pushupCounter.js          the rep state machine, pure, no DOM, no browser APIs
    styles.css
  tests/
    core/pushupCounter.test.js
    audioFeedback.test.js
    e2e/app.spec.js
Keep src/core/pushupCounter.js completely free of DOM and browser APIs. That
is what makes the rep logic unit testable in jsdom without a camera.
6. Screens
There is one route, /, and one screen. It changes shape through three CSS
state classes on the <main id="app" class="app-shell"> element, toggled from
JavaScript on every render:
has-camerawhen a camera stream is liveis-countingwhen the counter is actively runningis-completewhen the goal has been reached
There is no router, no navigation and no second page. Below, "mobile" means the
media query @media (max-width: 819px), (max-height: 699px), which deliberately
uses a comma so that a phone held in landscape stays on the mobile layout
instead of jumping to the desktop one.
6.1 Markup skeleton
Two sections inside the app shell.
<main id="app" class="app-shell">
  <section class="camera-panel" aria-label="Camera preview">
    <video id="cameraVideo" class="camera-video" playsinline muted></video>
    <canvas id="poseCanvas" class="pose-canvas" aria-hidden="true"></canvas>
    <div id="emptyPreview" class="empty-preview">
      <div class="empty-preview__mark" aria-hidden="true"></div>
      <p>Camera preview appears here after you tap Start.</p>
    </div>
    <div id="statusPill" class="status-pill" role="status">Ready</div>
  </section>

  <section class="control-panel" aria-label="Push-up counter controls">
    <div class="brand-row">
      <div>
        <p class="eyebrow">Private on-device counting</p>
        <h1>PushUpCam</h1>
      </div>
      <label class="power-toggle">
        <input id="lowPowerToggle" type="checkbox" />
        <span>Low power</span>
      </label>
    </div>

    <div id="permissionCard" class="notice-card hidden">...</div>
    <div id="fallbackCard" class="notice-card hidden">...</div>

    <div class="metrics-grid">
      <article class="metric-card metric-card--count">
        <span class="metric-label">Reps</span><strong id="repCount">0</strong>
      </article>
      <article class="metric-card">
        <label class="metric-label" for="goalSelect">Goal</label>
        <select id="goalSelect" class="goal-select">...</select>
      </article>
    </div>

    <div class="progress-wrap" aria-label="Goal progress">
      <div class="progress-meta">
        <span id="progressLabel">0 of 10 complete</span>
        <span id="progressPercent">0%</span>
      </div>
      <div class="progress-track"><div id="progressBar" class="progress-bar"></div></div>
    </div>

    <div class="coach-panel">
      <div><span class="metric-label">Rep phase</span><strong id="phaseLabel">Waiting</strong></div>
      <p id="coachText">Start the camera and move through one smooth push-up.</p>
    </div>

    <div class="transport-row">
      <button id="startPauseButton" class="primary-button" type="button" disabled>Start</button>
      <button id="resetButton" class="secondary-button" type="button">Reset</button>
    </div>
  </section>
</main>
Goal select options: 5, 10, 15, 20, 25, 30, labelled "5 reps" and so on, with 10 selected by default.
6.2 Mobile start state (no camera yet)
This is the first thing a phone user sees, and it is deliberately almost empty. On mobile the camera panel and control panel are stacked into the same grid cell so the controls float over the camera area. With no stream, hide the brand row, the permission card, the progress block, the coach panel, the reps card and the Reset button. What is left, bottom aligned over a dark gradient:
- Status pill reading "Ready", top left, over the empty preview.
- Centre of the screen: a 74x48 px rounded rectangle outlined 3 px in green with an 18 px yellow circle inside it, a stylised camera, at 0.72 opacity.
- Below it, in bold 1rem text: "Camera preview appears here after you tap Start."
- One card containing the label GOAL and a 52 px tall select at 1.25rem.
- One full width green Start button, minimum height 76 px, 1.45rem bold, with a
green glow shadow
0 18px 50px rgba(70, 211, 154, 0.24), centred with a max width of 440 px.
Nothing else. No permission screen, no explainer, no Reset. Tapping Start is what requests the camera, and that part is worth keeping: the original had a separate "Start camera" screen and removed it because it was an extra tap for nothing.
Every pixel size in this section is a tuned default. They came out of holding a phone at arm's length and then propping it against a wall, and they are a good place to start rather than a target. Size your own type and buttons however you like, as long as the start screen stays readable and tappable from where the phone will actually be.
6.3 Desktop layout
At min-width: 820px and min-height: 700px, switch to two columns:
minmax(0, 1.55fr) minmax(360px, 0.85fr), camera left, controls right, the
whole thing centred as a rounded card with a 1 px border, max width 1760 px,
minimum height 720 px. Everything is visible at once: brand row with the
PushUpCam wordmark and the Low power toggle, the Reps card next to the Goal
card, progress bar, Rep phase card with coach text, and Start plus Reset side by
side. The status pill sits bottom left of the camera panel. Between 820 px and
980 px wide, narrow the control column to minmax(320px, 0.82fr) and stack the
brand row vertically.
6.4 Counting state (mobile)
When is-counting, the control panel stretches to the full height and becomes a
transparent overlay with gradients at the top and bottom, so the camera is
visible behind it:
- Status pill hidden.
- Progress block pinned to the top in a blurred translucent card, 8 px tall track.
- Reps and Goal cards hidden. Notice cards hidden.
- Start (now labelled "Done") and Reset pinned to the bottom, centred, max width 420 px, 42 px tall.
The rep count itself is hidden while counting on mobile, because the voice reads each rep out and the progress bar carries the visual. On desktop the big count stays visible the whole time.
6.5 Camera live but paused (mobile)
has-camera without is-counting: brand row and coach panel hidden, Reps and
Goal shown as small blurred cards over the video (58 px tall, count clamped to
clamp(2.5rem, 13vw, 4.2rem)), Start and Reset at 42 px.
6.6 State by state
| State | Status pill | Rep phase | Coach text |
|---|---|---|---|
| First load | Ready | Waiting | Start the camera and move through one smooth push-up. |
| Requesting camera | Requesting camera... | unchanged | unchanged |
| Model downloading | Loading model... | unchanged | Loading pose detection. Keep your body in frame. |
| Camera restarted, model already loaded | Camera ready | unchanged | unchanged |
| Ready | Ready to count | live hint | Press Start, then move through full top and bottom positions. |
| Portrait camera feed detected | Portrait camera feed | live hint | Safari kept the selfie camera in portrait. For the wide sensor crop, rotate the phone sideways and restart camera. |
| Counting | Counting | Top / Bottom / Moving | Lower until your elbows bend, then press to the top. |
| Person not detected well enough | Searching for pose | Searching | Move into frame so shoulders, elbows, and wrists are visible. |
| Reached the bottom of a rep | Counting | Bottom | Good depth. Press back up. |
| Rep counted | Counting | Top | Rep counted. Control the next descent. |
| Goal reached | Goal complete | Complete | Goal complete. Nice set. |
| Paused | Paused | last value | unchanged |
| Switching low power mode | Switching camera... | unchanged | unchanged |
| Camera failed, manual mode | Manual mode | Waiting | Use Add rep to finish the set without camera tracking. |
| Manual rep added | Manual mode | Waiting | Manual rep added. |
| Reset with no camera | Manual mode | Waiting | Start camera or use manual mode. |
Those are the original's exact strings, and they are the entire coaching surface of the app, which is why they are written out in full. Copy them if you want a shortcut, or write your own voice. What is worth keeping is the coverage: every state has one line that tells the user what the app is doing and one that tells them what to do about it. The strings are yours, the coverage is the point.
6.7 Manual fallback card
Shown whenever the camera or the pose model cannot be used. Title "Manual
mode", a paragraph carrying the specific reason (see the error strings in
section 9.4), then a row with a 52 px square minus button
(aria-label="Subtract rep") and a full width green "Add rep" button. While the
fallback is showing, the empty preview stays visible behind it and the video
element is empty.
Plus adds a rep, beeps and speaks the number. Minus subtracts one, floors at zero, clears the completed flag, and makes no sound.
7. Feature list
Counting
- Live rep counting from the front camera using in browser pose detection.
- Rep phase readout: Waiting, Searching, Top, Bottom, Moving, Complete.
- Goal selector: 5, 10, 15, 20, 25, 30 reps, default 10. Changing the goal mid set keeps the current count and recomputes progress and completion.
- Progress bar plus "N of M complete" plus a rounded percentage.
- Start, which doubles as the camera request on first press.
- The Start button reads "Done" while counting, not "Pause".
- Reset, which zeroes the count, returns the phase to Waiting and re arms the completion announcement.
- Manual counter fallback with plus and minus.
Camera
- Front camera (
facingMode: "user"), mirrored preview. - 960x540 at 30 fps requested normally, 640x360 at 15 fps in low power mode.
- Automatic retry at 1280x720 when the browser hands back a portrait shaped track.
- Portrait feed detection with an on screen instruction to rotate the phone.
- Low power toggle: lower camera resolution and frame rate, plus every second animation frame skipped. Toggling it mid session restarts the camera and keeps the already loaded model.
- Counting pauses automatically when the page is hidden
(
visibilitychange).
Feedback
- 880 Hz beep on every rep.
- Two note chime on goal completion.
- Spoken rep count through the Web Speech API, one number per rep.
- Spoken "N. Goal complete." at the end.
- Vibration
[120, 80, 160]on completion where supported. - Skeleton and keypoint overlay drawn on the video every frame.
Platform
- Installable web app manifest, standalone display, dark theme colour.
- Safe area insets respected on all four edges,
100svhused alongside100vh, the page never scrolls on mobile. - Health route for the hosting platform.
Not present in the original. None of these exist, and the acceptance walkthrough in section 20 assumes their absence. Adding any of them is your call, it just makes the app yours rather than a rebuild of this one. The one that is not a free choice is persistence, because "nothing is remembered" is in section 2.1:
- No workout history, no personal best, no streaks.
- No sets, no rest timer, no between set countdown.
- No form warnings beyond the coach text lines above. Nothing measures back sag or elbow flare.
- No per rep haptics, only the completion buzz.
- No
localStorage,sessionStorage, IndexedDB, cookies or any other persistence. Reloading the page loses the count. That is intentional. - No service worker, so no offline support.
- No screen wake lock, so the phone may dim or sleep mid set. See section 14 if you want to add one.
- No light theme.
- No account, no login, no analytics, no error reporting.
8. The detection algorithm
This is the product, and it is the longest section for that reason. Read it as the reasoning behind the two rules in section 2.2, the dead band and the confidence gate, rather than as a set of values to match. Every constant below is a tuned default from real use with one body and one camera placement. Expect to move them. The structure is what carries the app: two separated thresholds, a confidence floor, a debounce, and counting in one direction only.
8.1 Model
MoveNet SinglePose Lightning, through the TensorFlow.js pose detection package.
0.35 below is the score under which a keypoint is treated as not seen, used for
the overlay and the display phase hint. Tuned default, raise it if the skeleton
flickers on noise, lower it if limbs keep vanishing.
// src/poseDetection.js
const MIN_KEYPOINT_SCORE = 0.35;

let detectorPromise;

export async function loadPoseDetector() {
  if (!detectorPromise) {
    detectorPromise = createPoseDetector();
  }
  return detectorPromise;
}

async function createPoseDetector() {
  const tf = await import("@tensorflow/tfjs-core");
  await import("@tensorflow/tfjs-backend-webgl");
  const poseDetection = await import("@tensorflow-models/pose-detection");

  await tf.setBackend("webgl");
  await tf.ready();

  return poseDetection.createDetector(poseDetection.SupportedModels.MoveNet, {
    modelType: poseDetection.movenet.modelType.SINGLEPOSE_LIGHTNING,
    enableSmoothing: true,
  });
}

export async function estimatePrimaryPose(detector, video) {
  const poses = await detector.estimatePoses(video, {
    maxPoses: 1,
    flipHorizontal: true,
  });
  return poses[0] || null;
}
Facts about this model, verified by fetching it on 2026-08-19:
- Weights come from
https://tfhub.dev/google/tfjs-model/movenet/singlepose/lightning/4, which 302 redirects towww.kaggle.com/models/google/movenet/tfJs/singlepose-lightning/4and then to a signedstorage.googleapis.comURL. model.jsonis about 168 KB. Two weight shards follow, 4,194,304 bytes and 455,912 bytes, so roughly 4.6 MB downloaded on first use.- Input tensor is
1 x 192 x 192 x 3int32. Output is1 x 1 x 17 x 3float, which is 17 COCO keypoints as y, x, score. The library converts those to pixel coordinates in the video's own coordinate space for you. - The three dynamic import calls above are what keep the model libraries out of the initial page load. Do not import them at the top of the module.
enableSmoothing: trueapplies the package's built in one euro keypoint filter, configured{ frequency: 30, minCutOff: 2.5, beta: 300, derivateCutOff: 2.5, thresholdCutOff: 0.5, thresholdBeta: 5, disableValueScaling: true }. That is the only smoothing in the app. The rep metric itself is not additionally averaged over time, the debounce below does that job instead.flipHorizontal: truemirrors the keypoints so they line up with the mirrored preview. Because the rep metric evaluates both sides and picks the more confident one, the resulting left and right relabelling does not matter.
8.2 The rep signal
Two different computations, and it is important not to confuse them. The shape of the counting metric matters, a single number from 0 at the bottom to 1 at the top that the thresholds can work on. The weights and angles inside it are tuned defaults.
A. The counting metric lives in src/core/pushupCounter.js and is a single
number in the range 0 to 1, where 1 is the top of a push up and 0 is the bottom.
Per side, using left_shoulder, left_elbow, left_wrist, left_hip and the
right equivalents:
function sideMetric(points, side) {
  const shoulder = points.get(side.shoulder);
  const elbow = points.get(side.elbow);
  const wrist = points.get(side.wrist);
  const hip = points.get(side.hip);
  const angle = calculateAngle(shoulder, elbow, wrist);

  if (angle == null || !shoulder || !elbow || !wrist) return null;

  const angleMetric = clamp((angle - 55) / 115, 0, 1);
  const confidence = averageConfidence([shoulder, elbow, wrist, hip].filter(Boolean));

  if (!hip) {
    return { metric: angleMetric, confidence, angle };
  }

  const torso = Math.max(distance(shoulder, hip), 0.001);
  const elbowDrop = clamp((elbow.y - shoulder.y) / torso, 0, 1);
  const metric = clamp(angleMetric * 0.8 + (1 - elbowDrop) * 0.2, 0, 1);

  return { metric, confidence, angle };
}

export function calculateAngle(a, b, c) {
  if (!a || !b || !c) return null;
  const ab = { x: a.x - b.x, y: a.y - b.y };
  const cb = { x: c.x - b.x, y: c.y - b.y };
  const denominator = Math.hypot(ab.x, ab.y) * Math.hypot(cb.x, cb.y);
  if (denominator === 0) return null;
  const cosine = clamp((ab.x * cb.x + ab.y * cb.y) / denominator, -1, 1);
  return (Math.acos(cosine) * 180) / Math.PI;
}
Read that carefully:
angleMetricmaps the 2D elbow angle linearly: 55 degrees or less is 0, 170 degrees or more is 1.- The hip is used only to normalise scale.
elbowDropis how far the elbow has fallen below the shoulder, measured in shoulder to hip lengths, so it is resolution independent and distance independent. Remember that imageyincreases downward. - The final metric is 80 per cent elbow angle and 20 per cent "elbow still up near shoulder height". That second term is what stops a seated arm curl from registering as a push up.
- If the hip keypoint is missing the metric is pure elbow angle.
- Confidence is the mean of the keypoint scores for that side, hip included when present.
- Both sides are computed and the one with the higher confidence wins. There is no averaging of the two sides in the counting path.
B. The display only phase hint lives in src/poseDetection.js and is used
for the Rep phase readout before you press Start. It is a much simpler rule and
it never counts anything:
// requires all three keypoints of an arm to score >= 0.35, else that arm is null
const elbowAngle = averageOf(leftAngle, rightAngle);   // degrees
const phaseHint =
  elbowAngle === null ? "waiting" :
  elbowAngle < 105    ? "down"    :
  elbowAngle > 150    ? "up"      : "moving";
Its confidence is the mean score of the six arm keypoints (both shoulders, elbows, wrists) that exist, and it is what gates the "Searching" label at 0.45.
8.3 The state machine
Three phases and one direction of travel counts. Pure function, no DOM.
These six values are the defaults the original settled on after real use. Treat them as a starting point and change any of them that feels wrong on your body and your camera placement. Two constraints from section 2.2 survive whatever you pick: the up and down thresholds keep a real gap between them, and the confidence minimum stays above zero.
export const PUSHUP_PHASES = Object.freeze({ READY: "ready", UP: "up", DOWN: "down" });

export const DEFAULT_COUNTER_OPTIONS = Object.freeze({
  goal: 10,
  upThreshold: 0.72,
  downThreshold: 0.38,
  minConfidence: 0.45,
  debounceFrames: 2,
  minFramesBetweenReps: 4,
});
Every frame, counter.update(pose) does exactly this:
-
framesSinceRep += 1, always, even on rejected frames. -
Normalise the input. Accept either
{ metric, confidence }directly (used by the tests) or a raw pose object, in which case readinput.landmarks, elseinput.keypoints, else the object itself, and run the side metric above. -
Confidence gate. If there is no reading, or
confidence < 0.45, clear any pending phase change, return an event of"low-confidence"and change nothing else. This is the only handling of poor lighting and of a person out of frame. There is no separate brightness check. -
Hysteresis. Work out the target phase, and note that a metric between the two thresholds never changes anything. The dead band is 0.38 to 0.72, which is 0.34 wide:
getTargetPhase(metric) { if (this.phase === READY) { if (metric >= this.options.upThreshold) return UP; if (metric <= this.options.downThreshold) return DOWN; return null; } if (this.phase === UP && metric <= this.options.downThreshold) return DOWN; if (this.phase === DOWN && metric >= this.options.upThreshold) return UP; return null; } -
Debounce. A target phase must hold for
debounceFramesconsecutive qualifying frames (default 2) before it is committed. A single stray frame resets the pending counter to 1 for the new target, and a frame that agrees with the current phase clears the pending state entirely. -
Count. A rep is added only on a committed transition from DOWN to UP, and only if
framesSinceRep >= minFramesBetweenReps(default 4). On a counted rep,framesSinceRepresets to 0. -
Completion fires once.
goalCompletedis true only on the single rep that first reaches the goal, guarded by a stickycompletedflag. Onlyreset()re arms it. -
Return a snapshot:
{ event, count, phase, completed, progress, goal, metric, confidence, pendingPhase, repCompleted, goalCompleted, phaseChanged }.
reset() sets count 0, phase READY, clears completed, and sets
framesSinceRep = minFramesBetweenReps so the very first rep of a new set is
not blocked by the spacing rule.
All option values are normalised on the way in: goal floored and at least 1,
thresholds clamped to 0 to 1 with downThreshold additionally clamped to at
most upThreshold, debounceFrames at least 1, minFramesBetweenReps at least
0.
What those thresholds mean in degrees. Because the hip term shifts the metric, the effective elbow angle depends on how low the elbow sits. Computed from the formula above:
| Elbow drop (in torso lengths) | UP needs elbow angle | DOWN needs elbow angle | |---|---|---| | 0.0 (elbow level with shoulder) | 129.8 deg or more | 80.9 deg or less | | 0.25 | 136.9 deg or more | 88.1 deg or less | | 0.5 | 144.1 deg or more | 95.3 deg or less | | 0.75 | 151.3 deg or more | 102.4 deg or less | | 1.0 (elbow a full torso below the shoulder) | 158.5 deg or more | 109.6 deg or less | | hip keypoint missing | 137.8 deg or more | 98.7 deg or less |
So in normal push up framing the user has to reach roughly a 130 to 145 degree elbow extension at the top and bend past roughly 81 to 95 degrees at the bottom. Half reps do not count, which is the point.
That table is the useful part of the numbers: it tells you what a threshold change means in the real world. If the app misses reps you are honestly reaching for, lower the up threshold and read the new angles off the same formula. If it counts while you rest at the top, raise it. If it accepts a shallow dip, raise the down threshold. Keep the two apart while you do it, per section 2.2.
Frames, not milliseconds. Both debounceFrames and minFramesBetweenReps
count iterations of the pose loop, not wall clock time. At about 30 inferences
per second that is roughly 67 ms of debounce and a 133 ms minimum gap between
reps. In low power mode, with every second animation frame skipped and the
camera at 15 fps, both roughly double. On a slow phone that cannot keep up they
stretch further. This is a real property of the design, not a bug: a device that
sees fewer frames also sees less noise per rep.
8.4 Optional: threshold calibration
The original ships a helper that derives thresholds from a sample of recorded metrics, and unit tests it, but never wires it into the UI. Build it only if you want a calibration step, and treat it as optional:
export function estimatePushUpThresholds(samples, options = {}) {
  const metrics = samples
    .map((sample) => normalizeReading(sample))
    .filter((reading) => reading && reading.confidence >= (options.minConfidence ?? 0))
    .map((reading) => reading.metric)
    .sort((a, b) => a - b);

  if (metrics.length < 2) {
    return { upThreshold: 0.72, downThreshold: 0.38 };
  }

  const lower = percentile(metrics, 0.2);
  const upper = percentile(metrics, 0.8);
  const gap = Math.max(upper - lower, 0.2);
  const margin = options.margin ?? Math.min(gap * 0.2, 0.12);

  return {
    downThreshold: clamp(lower + margin, 0, 1),
    upThreshold: clamp(upper - margin, 0, 1),
  };
}
8.5 The pose loop
One requestAnimationFrame loop, with a single inference in flight at a time.
Never stack inferences, and never await inside the frame callback.
function startPoseLoop() {
  cancelAnimationFrame(state.animationId);

  const tick = () => {
    state.animationId = requestAnimationFrame(tick);

    if (!state.detector || !state.stream ||
        elements.video.readyState < HTMLMediaElement.HAVE_CURRENT_DATA) {
      return;
    }
    if (state.estimating ||
        (elements.lowPowerToggle.checked && state.lowPowerFrame++ % 2 !== 0)) {
      return;
    }

    state.estimating = true;
    estimatePrimaryPose(state.detector, elements.video)
      .then((pose) => { drawPose(elements.canvas, elements.video, pose); handlePose(pose); })
      .catch(() => {
        showFallback("Pose detection could not run on this device.");
        pauseCounting();
        cancelAnimationFrame(state.animationId);
      })
      .finally(() => { state.estimating = false; });
  };

  state.animationId = requestAnimationFrame(tick);
}
The loop keeps running while paused, so the Rep phase readout stays live and the
skeleton keeps drawing, it just does not feed the counter. handlePose calls
counter.update only when state.running is true.
9. Camera and permissions
The resolutions and frame rates below are tuned defaults: 960x540 at 30 fps is
enough for a body at two metres without asking a phone for more pixels than it can
process, and the low power set halves the work. They are all ideal rather than
exact, so a browser is free to hand you something else, and your code has to cope
with whatever it gets. What is not negotiable here is the failure handling in
section 9.4 and the secure context requirement.
// src/camera.js
const BASE_CONSTRAINTS = {
  audio: false,
  video: {
    facingMode: "user",
    width: { ideal: 960 },
    height: { ideal: 540 },
    aspectRatio: { ideal: 16 / 9 },
    frameRate: { ideal: 30, max: 30 },
  },
};

const LOW_POWER_CONSTRAINTS = {
  audio: false,
  video: {
    facingMode: "user",
    width: { ideal: 640 },
    height: { ideal: 360 },
    aspectRatio: { ideal: 16 / 9 },
    frameRate: { ideal: 15, max: 20 },
  },
};

export function isCameraSupported() {
  return Boolean(navigator.mediaDevices?.getUserMedia);
}

export async function requestCamera(videoElement, { lowPower = false } = {}) {
  if (!isCameraSupported()) {
    throw new Error("This browser does not expose camera access.");
  }
  const stream = await navigator.mediaDevices.getUserMedia(
    lowPower ? LOW_POWER_CONSTRAINTS : BASE_CONSTRAINTS,
  );
  videoElement.srcObject = stream;
  await videoElement.play();
  await preferLandscapeTrack(stream, { lowPower });
  return stream;
}

export function stopCamera(stream) {
  stream?.getTracks().forEach((track) => track.stop());
}
9.1 The landscape retry
Front cameras on iOS often hand back a portrait shaped track even when the phone
is sideways. After the stream starts, if the track's settings report
width <= height, ask again for a real landscape track:
async function preferLandscapeTrack(stream, { lowPower }) {
  const track = stream.getVideoTracks()[0];
  if (!track?.applyConstraints) return;

  const settings = track.getSettings?.() || {};
  if (settings.width > settings.height) return;   // already landscape, done

  const supported = navigator.mediaDevices.getSupportedConstraints?.() || {};
  const constraints = {
    width:  { ideal: lowPower ? 640 : 1280 },
    height: { ideal: lowPower ? 360 : 720 },
    aspectRatio: { ideal: 16 / 9 },
    frameRate: lowPower ? { ideal: 15, max: 20 } : { ideal: 30, max: 30 },
  };
  if (supported.resizeMode) {
    constraints.resizeMode = "crop-and-scale";
  }

  try {
    await track.applyConstraints(constraints);
  } catch (error) {
    console.info("Landscape camera constraints were not accepted.", error);
  }
}
Swallow the failure. Some browsers reject the reapplied constraints and the app must carry on with whatever it got.
Then detect the leftover case in the UI. Whenever the video's metadata changes,
compare dimensions, and if videoHeight > videoWidth while a stream is live and
counting has not started, show the portrait guidance status and coach text from
the table in section 6.6. Do not try to rotate the feed with CSS. The original
tried that (rotate 90 degrees plus a mirror, sized from the panel's own bounding
box) and it was removed one commit later, because a rotated portrait crop still
shows less of the body than a true landscape sensor crop. Asking the user to
rotate and restart gives a better result.
Wire the detection to three things: loadedmetadata and resize on the video,
resize on the window, and a ResizeObserver on the camera panel.
9.2 Mirroring
Three pieces must agree:
.camera-video { transform: scaleX(-1); }mirrors the preview so it behaves like a mirror.estimatePoses(..., { flipHorizontal: true })mirrors the keypoints to match.drawPosemirrors the canvas before drawing:context.translate(width, 0); context.scale(-1, 1);then draw, thenrestore().
Get one of the three wrong and the skeleton sits on the wrong side of the body.
9.3 What the user sees while the model loads
The camera preview appears immediately, before the model exists. Set the status
pill to "Loading model..." and the coach text to "Loading pose detection. Keep
your body in frame." while loadPoseDetector() runs, then swap to "Ready to
count". There is no spinner and no progress bar for the download. On a slow
connection the user sits on that status for however long the 4.6 MB takes. If
you want a progress indicator, that is an addition, not a reproduction.
Cache the detector promise in a module level variable so a camera restart, for example from the low power toggle, reuses the model. In that case set the status to "Camera ready" instead.
9.4 Every failure state, with the exact copy
| Trigger | Reason string shown in the manual mode card |
|---|---|
| navigator.mediaDevices.getUserMedia missing at page load | This browser does not support camera access. |
| NotAllowedError or PermissionDeniedError | Camera permission was denied. Enable camera access in browser settings or use manual mode. |
| NotFoundError | No camera was found on this device. Manual mode is ready. |
| Page is not HTTPS and the hostname is not localhost or 127.0.0.1 | Camera access requires HTTPS on phones. Use the deployed HTTPS URL or manual mode. |
| Any other camera error | the error's own message, falling back to Camera could not start. Manual mode is ready. |
| estimatePoses throws or rejects | Pose detection could not run on this device. |
Check the HTTPS case after the named errors, since a browser on plain HTTP normally throws before you get a chance to look at the protocol.
Entering the fallback stops the camera tracks, hides the permission card, shows the manual card with the reason, clears the stream reference, sets the status pill to "Manual mode" and the coach text to "Use Add rep to finish the set without camera tracking.".
There is no lighting detection and no out of frame detection as separate states. Both surface through the confidence gate as "Searching for pose". Do not claim otherwise in the UI.
10. Feedback to the user
All of it lives in src/audioFeedback.js, built as a factory that takes
injectable rootWindow and rootNavigator so it can be unit tested without a
browser.
Tones. WebAudio sine oscillators, no samples, nothing to download. Every frequency, duration and gain in the table is a tuned default: the rep beep needs to cut through a room and be over before the next rep, and the completion pair needs to sound like an ending. Pick your own sounds freely. The envelope shape is worth keeping, because ramping exponentially to or from exactly zero is a no op in WebAudio and gives you silence.
| Sound | Frequency | Duration | Peak gain | Delay | |---|---|---|---|---| | Rep | 880 Hz | 0.09 s | 0.16 | 0 | | Completion, note 1 | 660 Hz | 0.16 s | 0.22 | 0 s | | Completion, note 2 | 990 Hz | 0.22 s | 0.24 | 0.18 s | | Silent unlock | 440 Hz | 0.02 s | 0.001 | 0 |
Envelope for every tone: gain.setValueAtTime(0.0001, start), then
exponentialRampToValueAtTime(volume, start + 0.01), then
exponentialRampToValueAtTime(0.0001, start + duration), and stop the
oscillator at start + duration + 0.03. Never ramp exponentially to or from
exactly zero, it is a no op in WebAudio.
iOS audio unlock. This is the part that breaks if you skip it. Mobile
browsers create the AudioContext in a suspended state and only a real user
gesture can resume it. So:
- On the first user gesture (Start pressed, Add rep pressed, camera enable),
call a
primeAudio()that creates the context if needed,awaitscontext.resume()if suspended, and once it is running plays the silent 440 Hz 0.02 s tone at gain 0.001. Guard it so it happens once. - Keep the in flight unlock as a shared promise so overlapping gestures do not create two contexts.
- Every later tone checks whether the context is running. If it is not, it calls
primeAudio()and schedules the tone in the promise'sthen, so the first rep beep is not silently dropped.
Speech. Web Speech API, SpeechSynthesisUtterance, rate 1.08, and
speechSynthesis.cancel() before each utterance so a fast set does not queue up
a backlog of numbers.
- On every rep except the one that completes the goal, speak the bare number:
"1","2","3". - On completion, speak
"<count>. Goal complete.", for example"10. Goal complete.". - Prime speech on the first gesture too, with one utterance of
"."atvolume = 0, otherwise the first real utterance can be swallowed. - Guard everything behind a check that both
speechSynthesisandSpeechSynthesisUtteranceexist.
Vibration. On completion only: navigator.vibrate([120, 80, 160]), guarded
by "vibrate" in navigator. There is no per rep vibration.
Visual feedback. The rep number, the progress bar (a scaleX transform with
a 180 ms ease transition, so it animates on the GPU), the phase label, and the
coach text lines. That is the whole of it.
11. The skeleton overlay
The colours, the line width, the dot radius and the 0.35 score gate below are
all tuned defaults. Which eight segments get drawn is a design decision too: arms
and torso only, because those are the joints the counting uses, so the overlay
shows the user what the app is actually looking at. Draw legs and a head if you
prefer. Drawn on a <canvas> stacked over the video, pointer-events: none,
aria-hidden="true", resized to video.videoWidth by video.videoHeight on
every frame and cleared before each draw. Bail out entirely if the video has no
dimensions yet.
- Segments: green
#46d39a,lineWidth = 5,lineCap = "round". Exactly eight of them: left shoulder to left elbow, left elbow to left wrist, right shoulder to right elbow, right elbow to right wrist, shoulder to shoulder, hip to hip, left shoulder to left hip, right shoulder to right hip. No legs, no head, no neck. It draws the torso box and both arms and nothing else. - Keypoints: yellow
#ffcf5afilled circles, radius 5. - Score gate: a segment is skipped if either endpoint scores below
0.35, and a dot is skipped if its own score is below0.35. So low confidence limbs simply vanish rather than flicking around the frame. - The whole draw happens inside a mirrored transform, see section 9.2.
- The canvas uses the same
object-fitas the video:containon desktop,coveron mobile.
12. Data model
There is no database and nothing is persisted. No table, no collection, no
file, no localStorage. Reloading the page returns the count to zero. Say this
out loud in the UI copy, the eyebrow text above the title reads "Private
on-device counting".
The only state is in memory for the life of the page:
// src/main.js
const state = {
  count: 0,                    // reps so far
  goal: 10,                    // from the select
  running: false,              // is the counter consuming frames
  completed: false,            // goal reached, announcement already fired
  phase: "waiting",            // "waiting" | "ready" | "up" | "down"
  counter: PushUpCounter,      // the state machine instance
  stream: null,                // MediaStream or null
  detector: null,              // MoveNet detector or null
  animationId: null,           // requestAnimationFrame handle
  estimating: false,           // an inference is in flight
  lowPowerFrame: 0,            // frame skip counter
  cameraIsPortraitFeed: false, // the portrait feed warning latch
};
// inside PushUpCounter
{
  options: { goal, upThreshold, downThreshold, minConfidence, debounceFrames, minFramesBetweenReps },
  count: number,
  phase: "ready" | "up" | "down",
  pendingPhase: "up" | "down" | null,
  pendingFrames: number,
  framesSinceRep: number,
  completed: boolean,
  lastMetric: number | null,
  lastConfidence: number,
}
// the snapshot returned by every counter call
{
  event: "reset" | "goal" | "frame" | "low-confidence",
  count: number,
  phase: "ready" | "up" | "down",
  completed: boolean,
  progress: number,        // 0 to 1
  goal: number,
  metric: number | null,
  confidence: number,
  pendingPhase: string | null,
  repCompleted: boolean,
  goalCompleted: boolean,
  phaseChanged: boolean,
}
If you later want history, that is the point at which you ask the platform for a
managed PostgreSQL database and add a sets table. Do not add it now.
13. API contract
The server exists only to serve the built files. There is no application API, because there is no server side logic and no data.
// server.js
import express from "express";
import path from "node:path";
import { fileURLToPath } from "node:url";

const __filename = fileURLToPath(import.meta.url);
const __dirname = path.dirname(__filename);
const app = express();
const port = Number(process.env.PORT || 8080);
const distDir = path.join(__dirname, "dist");

app.disable("x-powered-by");

app.use(
  express.static(distDir, {
    immutable: true,
    maxAge: "1y",
    setHeaders(res, filePath) {
      if (filePath.endsWith("index.html")) {
        res.setHeader("Cache-Control", "no-store");
      }
    },
  }),
);

app.get("/healthz", (_req, res) => {
  res.status(200).json({ ok: true });
});

app.get("*", (_req, res) => {
  res.sendFile(path.join(distDir, "index.html"));
});

app.listen(port, "0.0.0.0", () => {
  console.log(`PushUpCam listening on ${port}`);
});
| Method | Path | Request | Response | Status | Auth |
|---|---|---|---|---|---|
| GET | / | none | dist/index.html, Cache-Control: no-store | 200 | none |
| GET | /assets/* | none | hashed JS and CSS, Cache-Control: public, max-age=31536000, immutable | 200 | none |
| GET | /manifest.webmanifest | none | the PWA manifest | 200 | none |
| GET | /favicon.svg | none | the icon | 200 | none |
| GET | /healthz | none | {"ok": true} | 200 | none |
| GET | anything else | none | dist/index.html | 200 | none |
Note the last row. The catch all returns 200 with the app shell for unknown paths, it does not 404. That is deliberate for a single page app, and it is also what makes the platform's health check pass on any path.
The one outbound network call the app makes is the model download described in
section 8.1, initiated by TensorFlow.js. There are no other fetch calls in the
application code at all.
14. Mobile behaviour
The phone is the primary target and the last several rounds of work on the original were all mobile. Build these deliberately.
- The propped up phone use case. The user leans the phone against something a metre or two away, sideways, and walks back into frame. So: the start screen must be readable and tappable at arm's length, which is why the Start button is 76 px tall at 1.45rem, the goal select is 52 px at 1.25rem, and everything else is stripped off that screen. While counting, the only things on screen are the progress card at the top and two buttons at the bottom, both large.
- Voice is the primary feedback channel for exactly this reason. The user cannot read a small number from two metres away mid rep, so the app speaks each rep. The count is hidden on the mobile counting screen.
- Portrait versus landscape. The app works in both, and landscape phones stay
on the mobile layout by design. The media query is
@media (max-width: 819px), (max-height: 699px), and the comma matters: a landscape phone fails the width test but passes the height test, so it keeps the overlay layout instead of falling into the desktop two column card. The app does not lock orientation, and the coach text asks the user to hold the phone sideways because a landscape sensor crop sees more of a horizontal body. - Screen wake. The original does not use the Screen Wake Lock API, so a
long set can be interrupted by the screen dimming. If you want to fix that,
request
navigator.wakeLock.request("screen")when counting starts, release it when counting stops, and re request it onvisibilitychangeback to visible, because the lock is dropped when the page is hidden. Treat this as an improvement over the original, not a reproduction of it. - Pausing on background. A
visibilitychangelistener pauses counting when the document is hidden. The camera tracks are not stopped, so returning to the tab resumes without a new permission prompt. This also means the camera light stays on while paused, which is worth being honest about. - No scrolling.
htmlandbodyareoverflow: hidden, and the app shell is exactly100svhtall with100vhas the fallback. Useenv(safe-area-inset-*)on all four edges together withviewport-fit=coverin the viewport meta tag, so nothing hides under a notch or a home indicator. - Low power mode. A checkbox in the brand row. It drops the camera to 640x360 at 15 fps and skips every second animation frame, roughly halving the inference rate. Toggling it while the camera is live stops the stream, shows "Switching camera...", and restarts it while keeping the loaded model.
- Dense screens. At
max-height: 720pxshrink the button minimums to 40 px, the labels to 0.68rem and the tile paddings, so a short landscape phone still fits everything.
15. Look and feel
Dark only in the original: color-scheme: dark, no light theme, no theme toggle.
Everything in this section is yours. The tokens, type scale, breakpoints and sizes
below are the values the original settled on, written down so you have a working
palette to start from rather than a blank stylesheet. Change any of it. The two
things worth carrying over are the near total absence of motion, because the camera
loop needs the frame budget, and legibility from two metres away.
/* Design tokens as used by the original */
:root {
  /* surfaces */
  --bg-app:        #0b1020;   /* page background and theme-color */
  --bg-camera:     #111827;   /* camera panel, mobile shell */
  --card-bg:       rgba(246, 248, 251, 0.07);
  --card-border:   rgba(246, 248, 251, 0.12);
  --card-shadow:   0 18px 40px rgba(0, 0, 0, 0.18);

  /* text */
  --text:          #f6f8fb;
  --text-muted:    #b7c0d0;   /* notice and coach paragraphs */
  --text-label:    #9ea9bd;   /* eyebrow and metric labels */
  --text-meta:     #cbd4e4;   /* progress meta, mobile empty preview */
  --text-dim:      #a8b3c7;   /* desktop empty preview */
  --text-toggle:   #dce5f4;   /* low power label */

  /* accents */
  --accent:        #46d39a;   /* primary buttons, skeleton lines, progress start */
  --accent-warm:   #ffcf5a;   /* keypoint dots, progress end */
  --on-accent:     #08131c;   /* text on a green button */

  /* shape and motion */
  --radius:        8px;       /* everything, including buttons and cards */
  --radius-pill:   999px;     /* status pill and progress track */
  --tap-min:       44px;      /* 40px under max-height: 720px */
  --motion:        180ms ease;
}

body {
  background:
    linear-gradient(160deg, rgba(70, 211, 154, 0.16), transparent 34%),
    linear-gradient(20deg,  rgba(255, 207, 90, 0.12), transparent 38%),
    #0b1020;
}

.progress-bar {
  background: linear-gradient(90deg, #46d39a, #ffcf5a);
  transform: scaleX(0);
  transform-origin: left center;
  transition: transform 180ms ease;
}
Typography. One stack, no webfont is downloaded:
font-family: Inter, ui-sans-serif, system-ui, -apple-system,
             BlinkMacSystemFont, "Segoe UI", sans-serif;
line-height: 1.4;
Inter is listed first but not loaded, so most visitors get the system UI font. That keeps the page weight down. If you want Inter for real, self host it, do not add a blocking third party stylesheet.
Sizes, all fluid:
| Element | Size |
|---|---|
| h1 mobile | clamp(1.7rem, 9vw, 2.6rem), line height 0.98 |
| h1 desktop | clamp(2.8rem, 4.2vw, 5.8rem) |
| Rep count, base | clamp(3.3rem, 18vw, 5rem), line height 0.9 |
| Rep count, desktop | clamp(5.5rem, 8vw, 10rem) |
| Rep count, mobile with camera | clamp(2.5rem, 13vw, 4.2rem) |
| Eyebrow and metric labels | 0.78rem, weight 800, uppercase |
| Status pill | 0.86rem desktop, 0.78rem mobile, weight 700 |
| Buttons | weight 900 |
Motion. There is almost none, on purpose. The progress bar transform is the
only transition in the stylesheet. backdrop-filter: blur(12px) on the status
pill and on the floating mobile cards, blur(14px) on the counting progress
card. No entrance animations, no keyframes, nothing that could compete with the
camera loop for frame budget.
Breakpoints.
| Query | Effect |
|---|---|
| default | mobile first single column, grid-template-rows: minmax(180px, min(56.25vw, 38svh)) minmax(0, 1fr) |
| max-width: 520px | tighter control panel gap, card shadows removed |
| max-width: 819px, OR max-height: 699px | the mobile overlay layout, camera and controls share one grid cell |
| max-height: 720px | dense mode, smaller tap targets and labels |
| min-width: 820px AND min-height: 700px | two column desktop card |
| min-width: 820px to 980px AND min-height: 700px | narrower control column, brand row stacks |
| min-width: 1200px AND min-height: 700px | control panel vertically centred |
Accessibility the original honours. The specific labels are copy, so they are yours, but keep the coverage. Each of these costs one attribute and the app is worse without it:
aria-labelon the camera section ("Camera preview"), the control section ("Push-up counter controls") and the progress block ("Goal progress").role="status"on the status pill, so status changes are announced.aria-hidden="true"on the overlay canvas and on the decorative camera mark.aria-label="Subtract rep"on the minus icon button, since its only text is a hyphen.- A real
<label for="goalSelect">on the goal select. - 44 px minimum interactive height everywhere,
touch-action: manipulationon buttons to kill the double tap zoom delay. - Disabled buttons at
opacity: 0.5withcursor: not-allowed.
Two accessibility gaps in the original that section 19 tells you to fill rather
than copy: there is no :focus-visible styling beyond the browser default, and
there is no prefers-reduced-motion handling.
Icon and manifest.
{
  "name": "PushUpCam",
  "short_name": "PushUpCam",
  "start_url": "/",
  "display": "standalone",
  "background_color": "#0b1020",
  "theme_color": "#0b1020",
  "description": "Mobile-first in-browser push-up counter.",
  "icons": [{ "src": "/favicon.svg", "sizes": "64x64", "type": "image/svg+xml" }]
}
The favicon is an inline SVG: a #0b1020 rounded square, a white floor line, a
green arc for the body, and a #ffcf5a circle for the head. There is no service
worker, so the app is installable but not offline capable.
16. External services
Exactly one, and it is not optional.
MoveNet model weights, from Google's model CDN. About 4.6 MB fetched at
runtime from
https://tfhub.dev/google/tfjs-model/movenet/singlepose/lightning/4, which
redirects through www.kaggle.com to storage.googleapis.com. The app has no
API key for this and needs none, it is a public download. Consequences you must
tell the user about:
- First run needs a working internet connection, even though the inference itself is local. Nothing counts reps until that download finishes.
- The app does not work offline at all, first run or later, because there is no service worker caching the model. The browser's HTTP cache will often spare a repeat visitor the download, but that is not a guarantee.
- You depend on a third party host staying up and staying reachable. The
tfhub.devhostname is a redirect shim to Kaggle these days and could change again.
If you want to remove that dependency, download model.json and both
group1-shard*.bin files once, commit them under public/models/movenet/, and
pass modelUrl: "/models/movenet/model.json" in the detector config. That adds
about 4.6 MB to your repository and your deploy, removes the third party
dependency, and makes the first run faster. It is a fair trade for a production
app. Do not use the fromTFHub path when you self host.
No other external service. No analytics, no error reporting, no auth provider, no storage, no email, no payment. Nothing to provision, nothing to configure, no credentials to save.
Privacy, stated plainly, because it is the selling point. All inference runs
in the browser through WebGL on the device's own GPU. The video stream is
attached to a <video> element and read frame by frame into a tensor. No frame,
no still image, no keypoint and no rep count is ever sent anywhere. There is no
endpoint to send it to: the server serves static files and answers a health
check, and the application code contains zero fetch calls. Put that on the
screen. The eyebrow above the title reads "Private on-device counting" and the
copy says "Video stays on this device."
17. Environment variables
The application reads exactly one variable. Ship this .env.example with
placeholders only and never commit a real .env:
# The HTTP port the server binds. Your hosting platform normally injects this,
# usually 8080. 8080 is also the local fallback.
PORT=8080

# Optional, and NOT read by any code in this app as built. Add these only if you
# actually wire up observability later.
# APP_BASE_URL=https://your-app-hostname.example
# LOG_LEVEL=info
# SENTRY_DSN=YOUR_SENTRY_DSN_HERE
Add .env and .env.* to .gitignore with a !.env.example exception. There
are no secrets in this app, and it should stay that way.
18. Deploying on Liivo
Liivo builds from a git repository and gives you a generated public HTTPS URL. Verified against the platform's own deploy guide on 2026-08-19: it clones the repository, then from the repository root runs
npm install
npm run build
npm start
There is no per workspace build configuration and no manifest file that changes that sequence, and the whole repository is part of the build context.
The camera point first, because it decides whether the app works at all.
getUserMedia only runs in a secure context. That means HTTPS, or localhost.
Liivo's generated public URL is HTTPS, shaped like
https://<generated-prefix>.apps.liivo.io where the prefix is assigned rather
than chosen, so it looks like fresh-brim-teeth rather than your app name.
Deployed on Liivo the camera works. Served over plain http:// from your own
machine's LAN address it will not, and the app will show the "Camera access
requires HTTPS on phones" message and fall back to manual counting. So: build
locally, but do your real phone testing against the deployed HTTPS URL.
What the repository must look like.
- One deployable app at the repository root, and one app per repository. A
single
package.jsonat the top level with both abuildand astartscript. Both must exist. This app is mostly client side code, but that does not let you deploy a bare folder of HTML and JavaScript with nopackage.json, and it does not let you skip either script. buildrunsvite buildand writesdist/. If you ever strip the build step out, replace it with a no op such as"build": "echo no build step"rather than deleting the script.startrunsnode server.js, which servesdist/and listens onprocess.env.PORTwith a fallback of 8080, bound to host0.0.0.0. Never hardcode the port in production.dist/is in.gitignore. The platform builds it./answers 200 quickly, because it is a static file./healthzis there as a cheap explicit health route.- No Dockerfile is needed. This is a plain Node app with no system package dependencies, no Prisma, no ffmpeg. Do not add one.
- No backing services are needed. Do not ask the platform for a database, a
cache or a bucket. There is nothing to store. If you later add workout
history, that is the moment to ask the MCP connector for a managed PostgreSQL
instance, take the connection string it shows you once, and read it from an
injected
DATABASE_URL. - Nothing is written to disk at runtime, so the ephemeral container filesystem is not a problem here.
- The app needs HTTPS but it does not need to know its own address, and those
are two different things worth keeping apart. There is no webhook, no OAuth
redirect, no email link and no callback of any kind, so nothing in the code
reads
APP_URLorPUBLIC_URLand there is no base URL to configure. What the app does need is a secure context, which the platform's generated HTTPS URL gives you for free. If you later add something that does need an absolute URL, note that an injectedAPP_URLstyle variable can carry the platform's internal hostname rather than the public one, which makes it right for service to service callbacks and wrong for anything a human has to click. Build user facing links in the browser fromwindow.location.origininstead. - Do not put this app in a monorepo subdirectory. A
subPathsetting exists for deploying one workspace out of a larger repository, and you should not use it.subPathcombined with the parameter store silently loads zero environment variables, because the start command runs from inside the subdirectory and bypasses the root level config fetch, so the app boots without its configuration and fails in a way that is very hard to diagnose. That is a known platform issue, not something you can configure away. One repository, one app.
The model weights and your deploy size. The whole repository is the build
context, so anything you commit inflates every deploy. This app takes the light
option: it commits no model weights and fetches about 4.6 MB from Google's
model CDN at runtime (see section 16). The deploy stays tiny, and the cost is a
hard network dependency on first use plus no offline support. The alternative,
committing model.json and both weight shards under public/models/movenet/,
removes the third party dependency and speeds up first run, but adds about 4.6 MB
to the repository and to every single deploy. Pick one deliberately and say which
one you picked, because the two behave very differently for a user on a bad
connection.
When the deploy fails, work down this list before rewriting anything:
- Are both a
buildscript and astartscript present in the rootpackage.json? A missing one is the most common cause. - Did
npm installand thennpm run buildsucceed? Ask for the build log. The Vite build prints a warning that some chunks are larger than 500 kB. That warning is expected here, the TensorFlow.js chunk is genuinely large, and it is not an error. - Does
startactually stay running, or does it exit immediately? - Is the server reading
process.env.PORTand binding0.0.0.0? - Is
dist/actually present after the build? Ifstartruns beforebuild,express.staticpoints at a directory that does not exist and every route falls through to the catch all, which then fails onsendFile. - Is the app at the repository root rather than in a subdirectory? See the
subPathwarning above. - Does the page load but the camera never start? Check that you are on the HTTPS URL, and check the browser's site permissions. On iOS, camera permission for a site can be denied persistently and has to be reset in Settings.
- Does the camera start but no reps count? That is not a deploy problem, see the acceptance checklist below.
If you are not on Liivo, this is a standard Node app with no platform
specific code. Anything that can run npm run build and npm start and inject
PORT will host it. A pure static host also works if you serve dist/ with a
single page app fallback rule, since the Express server does nothing else.
19. Things the original did that you should not copy
Seven quirks live in the shipped code. They are not features and they are not worth reproducing. Build the fixed version instead. Each note says what the original did in one line, then what to do.
- A dead permission card. The original ships a
#permissionCardelement with a "Start camera" button that the JavaScript only ever hides, so it is unreachable markup. Do not build it. The Start button owns the camera flow. - A state class with no styles.
is-completeis toggled on the shell every render and styles nothing. Either give completion a visible treatment or drop the class. Do not carry a class that does nothing. - Layout state classes scoped only to mobile. All the
has-cameraandis-countingrules sit inside the mobile media query, which is why the desktop layout looks identical before and during a set. If you build a desktop layout, let it respond to the same states. - An accidental button re enable. Entering manual mode disables the Start button and the very next render enables it again, because the render only checks whether the browser supports a camera at all. Retrying after a denial is good behaviour, so make it deliberate: leave Start enabled, label it as a retry, and let it ask again.
- A manual count that the camera wipes. Manual mode increments its own counter and never tells the rep state machine, so if the camera later starts, the first synced snapshot overwrites the manual reps with zero. Keep one source of truth: have the manual buttons feed the same counter the camera does.
- A calibration helper wired to nothing.
estimatePushUpThresholds()in section 8.4 is exported and unit tested but never called. Either give it a button, or leave it out. Do not ship tested dead code. - A font that is named but never loaded. Inter is first in the font stack and nothing downloads it, so the app renders differently on machines that happen to have Inter installed. Pick one: self host the font, or drop it from the stack and use the system UI font on purpose.
While you are in there, two more absences in the original are worth filling
rather than reproducing: there is no :focus-visible styling and no
prefers-reduced-motion handling, and there is no screen wake lock, so a long set
can be interrupted by the screen dimming. See section 14 for the wake lock
mechanics.
20. Acceptance checklist
Each item is observable, and the list describes the original's exact copy and numbers. It is a walkthrough rather than a test suite: where you changed a string, a colour, a size or a threshold, check the behaviour and ignore the literal value. The items that are not negotiable are the ones that map to section 2.2, which are 19 to 26 on counting, 9 to 14 on the camera and permission paths, 33 and 34 on manual mode, and 35 and 36 on privacy. Walk those in front of a real camera.
Shell and layout
npm install, thennpm run build, completes and writesdist/. The build prints six asset lines and one chunk size warning.- The entry JavaScript chunk is under 25 kB and the CSS under 12 kB. The large TensorFlow.js chunks exist as separate files and are not loaded on first paint. Check the network panel: opening the page downloads the small entry only.
npm startwith noPORTset logsPushUpCam listening on 8080.GET /healthzreturns{"ok":true}with status 200.GET /some/random/pathreturns 200 and the app shell, not a 404.- At a 375x812 viewport the first screen shows only: a "Ready" pill top left, a small green camera outline with a yellow circle centred, the line "Camera preview appears here after you tap Start.", a GOAL card with "10 reps" selected, and one large green Start button at the bottom. No PushUpCam wordmark, no Reps card, no Reset button, no progress bar.
- At a 1280x860 viewport the layout is two columns, camera left, and the right column shows the eyebrow "PRIVATE ON-DEVICE COUNTING", the PushUpCam heading, a Low power checkbox, a REPS card reading 0, a GOAL select, "0 of 10 complete" with "0%", a REP PHASE card reading "Waiting" with the line "Start the camera and move through one smooth push-up.", and Start next to Reset.
- The page does not scroll vertically at any viewport size.
Camera and permissions
- Tapping Start with no camera yet triggers the browser's camera permission prompt. There is no intermediate "Start camera" screen.
- Denying permission puts a "Manual mode" card on screen reading "Camera permission was denied. Enable camera access in browser settings or use manual mode.", sets the status pill to "Manual mode", and shows a minus button next to an "Add rep" button.
- Granting permission shows a mirrored preview of yourself. Raise your right hand and the hand on the right of the screen goes up.
- While the model downloads the status pill reads "Loading model..." and then changes to "Ready to count".
- Once the model is loaded, a green skeleton appears over your torso and arms with yellow dots on the joints. Legs and head have no lines drawn. Turn side on and the limbs that the model loses confidence in disappear rather than jittering.
- Serve the app over plain HTTP from a LAN address and open it on a phone. The manual mode card reads "Camera access requires HTTPS on phones. Use the deployed HTTPS URL or manual mode."
Counting
- Before pressing Start, the REP PHASE readout tracks your arms live: "Top" when your elbows are extended past 150 degrees, "Bottom" under 105 degrees, "Moving" in between, and "Searching" when you step out of frame.
- Press Start. The pill reads "Counting" and the coach line reads "Lower until your elbows bend, then press to the top."
- Do one full push up. The count goes to 1, an 880 Hz beep plays, a voice says "1", and the coach line reads "Rep counted. Control the next descent."
- At the bottom of a rep the coach line reads "Good depth. Press back up."
- Do a deliberate half rep, bending only to about 120 degrees. Nothing counts.
- Hold still at the top and jitter your elbows slightly. The count does not move. Values in the 0.38 to 0.72 metric band never change phase.
- Bounce as fast as you physically can. The counter does not add two reps for one movement, because a rep needs a debounced DOWN then a debounced UP with at least four frames since the last rep.
- Step out of frame while counting. The pill reads "Searching for pose", the phase reads "Searching", and the coach line reads "Move into frame so shoulders, elbows, and wrists are visible." Step back in and counting resumes from the same number.
- Reach the goal. The pill reads "Goal complete", the phase reads "Complete", the progress bar is at 100 per cent, a two note chime plays, the phone vibrates, and a voice says the count followed by "Goal complete."
- The completion chime and announcement fire exactly once, not again on the next frame.
- Press Reset. Count returns to 0, phase to "Waiting", progress to 0 per cent, and the completion announcement can fire again on the next completed goal.
- Change the goal from 10 to 20 mid set with 6 reps counted. The count stays at 6, the label reads "6 of 20 complete" and the percentage recalculates to 30 per cent.
Mobile specifics
- On a phone, while counting, the screen shows only the progress card at the top and two large buttons at the bottom over the live camera. The big rep number is hidden and the voice carries the count.
- The Start button reads "Done" while counting, not "Pause".
- Switch to another app and come back. Counting has paused, the pill reads "Paused", and no new permission prompt appears.
- Tick Low power while the camera is live. The pill reads "Switching camera...", the camera restarts, the model is not downloaded again, and the preview visibly drops to a lower resolution.
- Hold the phone sideways on an iPhone. If the browser still hands back a portrait feed, the pill reads "Portrait camera feed" and the coach line asks you to rotate the phone sideways and restart the camera.
- Everything is legible and tappable with the phone propped two metres away.
Manual mode
- In manual mode, "Add rep" increments, beeps and speaks the number. The minus button decrements, floors at zero, and is silent.
- Reaching the goal manually fires the same completion chime, vibration and announcement.
Privacy and tests
- Watch the network panel through a whole set. After the model download finishes there are no further outbound requests. No frames, no telemetry, nothing.
- Open the browser's storage inspector.
localStorage,sessionStorage, IndexedDB and cookies are all empty. Reload the page and the count is 0. npm testpasses 11 tests across two files, 9 for the counter and 2 for the audio module.npm run test:e2epasses one smoke test at a 390x844 viewport, asserting that the camera preview region, the Goal combobox and the Start button are visible, and that a "Start camera" button is not visible.
21. Build order
Three passes, not one sitting. The single most useful thing you can do is get stage 1 deployed and reachable at an HTTPS URL before you build anything else, because until then you cannot test the camera on a phone at all, and the camera is the app.
If you are working from the core brief alone, that is enough for stage 1. Paste section 1, build stage 1, deploy it, then come back and paste or refer to the rest of this document for stages 2 and 3.
Stage 1: the smallest thing that is recognisably the app, deployed
The target is a phone, propped up, counting your reps out loud at a real HTTPS URL. No polish.
- Scaffold and deploy an empty shell first. A root
package.jsonwith abuildand astartscript, anindex.html, and the static server from section 13. Push it and deploy it, and confirm the generated HTTPS URL loads on your phone. Do this before writing any app logic. If the deploy is going to fight you, find out now, and work down the list in section 18 when it does. - The rep state machine, with tests, before any camera code. Section 8.3.
Feed it plain
{ metric, confidence }objects and assert on the snapshots. Cover one clean rep, a noisy sequence inside the dead band that must not count, a target phase that flickers and must not commit, a low confidence frame that clears the pending transition, a reset, and the goal firing exactly once. This is the part that is miserable to debug through a camera, so debug it through numbers. Do not move on until it passes. - Camera on screen. Section 9, with
facingMode: "user", the mirrored preview, and Start as the thing that requests permission. Handle the denied path immediately, in the same sitting, along with the other failures in section 9.4 and the manual plus and minus counter. This is section 2.2 work, so it does not wait for stage 3. - Pose detection and the loop. Section 8.1 and 8.5: the lazily imported detector, one inference in flight, the mirrored overlay so you can see what the model sees. Confirm the skeleton tracks you before you wire the counter to it.
- Join them and add the voice. Feed poses to the counter, show the count and the progress bar, speak each rep and beep. Do the mobile audio unlock properly here rather than bolting it on later, section 10, because it is the single most common thing people get wrong and it fails silently.
- Deploy again and do a real set in front of the phone. Then retune the thresholds, which you will need to do. See section 2.3.
At the end of stage 1 you have the seven things in section 2.1 and the whole of section 2.2. Everything from here is addition.
Stage 2: the rest of the core brief
The features from section 1 that stage 1 skipped.
- The goal selector and completion. Goals from 5 to 30, the "N of M complete" line and percentage, changing the goal mid set without losing reps, and the completion moment: the two note chime, the vibration and the spoken announcement, firing exactly once.
- The rep phase readout, live before Start, so a user can check their framing without starting a set. Section 8.2 part B.
- The three layout states. Section 6. Fake them by hand editing the class list on the shell in devtools so you can see every layout without doing push ups. Build the mobile counting overlay properly: progress at the top, two large buttons at the bottom, camera behind, nothing else.
- Low power mode, section 14, and the pause on
visibilitychangethat does not stop the camera tracks and so does not trigger a second permission prompt. - The desktop layout, if you want one. Section 6.3. It is a convenience, not part of the app's reason to exist.
Stage 3: polish, feel and the back of the document
- The look. Section 15: the palette, the type scale, the near total absence of motion, the blurred floating cards. This is where the app stops looking like a prototype.
- The propped up phone details. Section 14: safe area insets on all four edges, no page scrolling, the dense breakpoint for short landscape phones, and legibility from two metres.
- The iOS portrait feed guidance. Section 9.1. Real problem, but only worth solving once everything else works.
- Installability, section 15: the manifest and the favicon.
- Tests and the smoke test. Section 20 as a walkthrough, plus one Playwright run at a mobile viewport if you want the safety net.
- The fixes from section 19, if you have not already built the fixed versions as you went. Better to have done it as you went.
Skip unless you want them: the threshold calibration helper in section 8.4, a service worker, self hosted model weights, a screen wake lock, workout history. None of them are needed for the app to be what it is, though the wake lock is the one a real user is most likely to ask for.
22. Hard won facts and gotchas
Reference material for when something goes wrong, not part of the build sequence. Nothing here needs reading to build the app. Every item cost somebody time to find once, and none of it is guessable from the code. Skip it until a symptom matches.
The model URL is a redirect chain through a third party, and it is dated.
Measured on 2026-08-19: https://tfhub.dev/google/tfjs-model/movenet/singlepose/lightning/4
302 redirects to
https://www.kaggle.com/models/google/movenet/tfJs/singlepose-lightning/4?tfjs-format=file&tfhub-redirect=true
and from there to a signed storage.googleapis.com URL. That is a snapshot of how
a third party had it wired on that date, and Google has already moved this model
once. Two consequences. First, if you are debugging the download, note that
fetching the bare model page with a browser style request returns 400 while
the library's actual request path, <base>/model.json?tfjs-format=file, returns
200, so a hand rolled curl proving nothing is not proof of a broken CDN.
Second, if the URL is simply dead by the time you read this, do not conclude the
app cannot be built: self hosting the weights is a first class option. Download
model.json and both group1-shard*.bin files from wherever the model now lives,
commit them under public/models/movenet/, and pass
modelUrl: "/models/movenet/model.json" in the detector config. Do not keep the
fromTFHub flag when you self host. Any current in browser pose model with
shoulder, elbow, wrist and hip keypoints is also a legitimate substitute, per
section 2.3.
Set the backend before you create the detector, and await both.
await tf.setBackend("webgl") then await tf.ready() then createDetector, in
that order. Create the detector first and it can initialise on whatever backend
happens to be registered as default. A CPU fallback does not throw, it just runs
the model far too slowly for a per frame loop, so the symptom is a skeleton
updating a few times a second on a phone that should manage thirty, with a clean
console. WebGL is what makes the frame rate usable at all.
Cache the detector promise, not the detector. A camera restart, for example toggling low power mid session, then reuses the in flight or resolved load instead of downloading the weights again. Caching the resolved detector alone leaves a window where two restarts in quick succession start two downloads.
What the built bundle should look like. Measured on the finished app with Vite 7: entry chunk 18.71 kB of JavaScript plus 9.78 kB of CSS, then lazy chunks of 20.94 kB, 260.94 kB, 334.10 kB and 534.08 kB, so roughly 1.15 MB raw and about 295 kB gzipped sitting behind the dynamic import. If your entry chunk is over a megabyte you imported the pose libraries at the top of a module instead of inside the async detector factory. The "some chunks are larger than 500 kB" warning from Vite is expected here and is not an error.
Gate the loop on video.readyState. Require at least
HTMLMediaElement.HAVE_CURRENT_DATA, which is 2. Calling the detector on a video
element that has no current frame throws, and it happens reliably in the gap
between play() resolving and the first frame arriving, so it looks like an
intermittent bug rather than a race.
Do not average the two sides. Both sides are computed and the more confident
one wins. Averaging is the tempting simplification and it breaks counting: a
tracked arm averaged with an occluded one pulls the metric toward the middle of
the dead band, where by design nothing ever changes phase, so reps quietly stop
being counted whenever one shoulder is turned away from the camera. The scale
normalisation exists for the same reason. Dividing the elbow drop by the shoulder
to hip distance expresses it in torso lengths, which makes the metric independent
of the camera resolution and of how far away the person stands, so the same
thresholds work at one metre and at three, and on a 640 wide feed and a 1280 wide
one. Guard that divisor with Math.max(distance, 0.001), because a front on pose
can put the shoulder and hip almost on top of each other.
A unit test that catches the audio unlock regression. The unlock ordering in section 10 is easy to break and it fails silently on the one platform it exists for. The cheap guard is a jsdom test asserting that a prime followed by one rep beep creates exactly two oscillators, the first at 440 Hz and the second at 880 Hz. Wrong order, a missing unlock or a duplicated context all change that count or those frequencies. This is the reason the audio module is built as a factory taking injectable window and navigator objects: without the injection there is nothing to assert against.
env(safe-area-inset-*) is zero without the meta tag. The insets only
resolve to real values when the viewport meta carries viewport-fit=cover.
Without it every inset reads as zero, the CSS looks correct, and the layout still
slides under the notch and the home indicator.
A landscape phone fails a width only breakpoint. The mobile media query uses
a comma, @media (max-width: 819px), (max-height: 699px), and a comma is OR. A
phone held sideways is wider than the mobile breakpoint but shorter than the
desktop one, so without the height clause it drops into the desktop two column
layout on a 390 px tall screen. If you build a desktop layout, add the height
condition to every desktop query as well, not just the mobile one.
Keeping the tracks alive while paused is a real trade off, not a free win.
Not stopping the MediaStream on pause is what lets a return from the background
resume with no second permission prompt. The cost is that the camera indicator
light stays on the whole time, which users notice quickly on an app whose whole
pitch is privacy. Decide which way you want it and say so in the UI either way.
Low power mode is two changes, not one. Lower camera constraints alone barely help, because the expensive work is the inference and it runs per animation frame rather than per camera frame. You need the lower constraints and a frame skip that runs the detector on every second frame. Either one on its own leaves most of the cost in place and users will report that the setting does nothing.
The rotated portrait feed is a dead end. If iOS hands back a portrait shaped
front camera track, the tempting fix is a CSS rotate(90deg) on the video with
the canvas sized to match. It was tried on the original and reverted immediately,
because a rotated portrait crop still contains less of a horizontal body than a
real landscape sensor crop, so keypoints at the wrists drop out at the edges of
the frame. The applyConstraints retry in section 9.1 plus asking the user to
rotate the phone and restart the camera gives better tracking than any amount of
CSS.